Boiling Milk

Unlike water, boiling milk with an electric kettle can be a tricky task. One time, I have had a reader ask me this question for which, I had provided a detailed reply (not comprehensive by any means). As part of phase 2 of this blog, I thought, it would be interesting to post these questions and answers for the benefit of other readers.

Hi Manoj,
After a lot of browsing, I landed up in ur blog and it is really useful.
I am using a flat bottom (concealed heating element) 1500W kettle but when i boil milk, it burns and sticks to the bottom, giving an unpleasant taste. How do I overcome this problem??

The issue may be due to the following reasons.
The 1500 W kettle – generates immense heat which is more than enough for milk to get boiled.
The milk. If you are using double cream, there is more chance for it to get burnt and stuck to the bottom.
A few things that you can do to solve the issues are.
1. Add water to milk before switching on the kettle. (15 % to Volume of milk).
2. Instead of leaving the kettle unattended, you can fiddle with the kettle on of switch a few time so that it won’t get stuck to the bottom.
3. Constantly stir the milk. Make sure you don’t get a steam burn.

This has happened to me also. I use a 1000W kettle. Those were the things I did to sort out the issue.

Make sure you clean the kettle after the adventure.


Cleaning the Kettle

Well, if you ask me what are the things I really hate doing, one of the first things I would say is cleaning dishes. I hate it as much as the next person. My strategy for cleaning dishes is as follows.

Once I’m done cooking, I plate the dishes and clean everything I can, including the kitchen so that there’s only very little to clean afterward. I have a relaxed meal and clean my plates.

Cleaning your electric kettle can be difficult at times, depending on what adventure you had with it (Especially after boiling milk, making rice, pasta). I have a four-step process I follow to clean my kettle. So here it is, for everyone.

Make sure you disconnect the kettle from the power socket before starting the cleaning process to avoid the risk of electrocution. 

  • Soaking

Once you are done boiling milk. Never leave the kettle to dry. Fill it with water and let it sit for a while (15-20 minutes at least). You can also use a mixture of liquid dishwashing soap and water.

  • Scraping

Use a wooden ladle to scrape the bottom of the kettle (there might be some discoloration due to the burnt milk protein. Please don’t use any sharp objects for this as it may damage the kettle. Or the worst case, give you an injury by accident.

  • Cleaning

Depending on the state of your kettle, you might have to go back to soaking sometimes. Otherwise, clean the kettle with water to remove the soap residue.

  • Drying

Please use a paper towel or a dry cloth to pat dry the kettle.

Must read

Things that you must be aware of, before getting onboard!

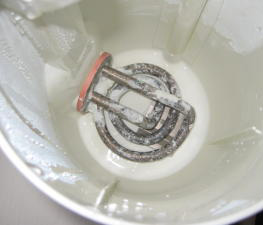
You must be well armed about your instrument, Usually electric kettle comes with short length cord. So if you need an extension make sure you are using something that could withstand the current, or else the instrument will get burnt, or damaged. That’s no kettle cooking. It is better to rely on a 3 pin socket that can withstand above 5A current. The Kettle must be of the hot pan type and not the inside coil type.

coil type

Inside coil type Electric Kettle.

Flat bottom type Electric Kettle.

Make sure the kettle has a thermostat relay, this will ensure that the kettle will heat only up to set temperature. Inherently, an electric kettle is not designed to perform high-end cooking so whatever we are doing is pushing the instrument to the limits so the behavior cannot be predicted.

The kettle must be above 750W, and I’m using a ‘whiteline’ make kettle(750W) to do the trials. Whatever you are doing, believe me, It’s worth doing.

A word of warning

Please have necessary kitchen rags and gloves, keep a burn cream also. Use a wooden spoon for blending purposes.Whatever I’m doing, I ought to be responsible for the after effects, but I cannot take responsibility for your wrongdoing. The things that I’ve shared are the things that worked for me. Also, make sure that you read the manual of the machine before using it.

 Wish you a happy cooking with kettle.

 Yours

Gangadharan,Manoj Kumar

smiley-face

Updates!!

Hello, there lovely folks!

I know, it’s been a while since I have posted anything new or interesting here. But things are gonna change soon. I have decided to spend at least a few hours on this blog every week, pursuing #cookingwithakettle. I will be testing out new recipes and techniques and post it over here for you.

Meanwhile, like always, If you find something interesting that other readers of this blog might like, feel free to let me know. And, if you have any doubts or questions or confusions regarding the things I post (English is not my first language :(), feel free to ask. I will do my best to address those issues.

Like always, please be aware that the kettle is not a device inherently designed for cooking and doing so has many risks and dangers. Please read the instruction booklet and please be aware of the health, safety and fire regulations of the respective states you are in. These are my adventures and if you are following this and doing things, please be aware that you are doing it at your own risk.

Wish you all the best in your adventures and let’s see how we take off together.


Mixed Vegetable Soup with a twist by Jane

Hi all.
Here is a beautiful mixed vegetable soup recipe, shared by Jane, a PhD student from London. It was posted as a comment to the ‘about’ page.
I took the liberty to share it with other friends of mine. And friends, Jane did this with an element type electric kettle. Even though I have an element type kettle with me, I haven’t had any adventures with them lately. So this is a real inspiration for me. I hope you will also like the recipe. Below is the original comment and recipe with slight modifications.

Thank you Jane

Hey, I am a PhD student with no money and a hungry tummy in London. I get sick of eating sandwiches and cold leftovers from home. I have a kettle in my office (it’s the type with an element, rather than a heating plate – but I don’t let that stop me!), and I also have a blender. I think this is a magical combination – allowing me to make nutritious soups every day…

Here’s what I do:

  1. Chop up vegetables of your choice into small pieces – they cook quicker (at the moment I’m eating broccoli, carrots, potatoes, celery and other seasonal, cheap vegetables)
  2. Put the chopped veg into the kettle. Just cover with cold water and click the switch on. Allow to boil, the leave the vegetables in the hot water for a few minutes, 3-5 minutes is sufficient.
  3. Then pour the whole lot into the blender – remove a bit of the hot water,(if it looks like too much), you can always add more. 🙂
  4. Add some seasoning: salt, pepper and stock powder (I like Marigold Swiss Boullion) to taste and a very generous knob of butter. You can also add some cream at this stage if you like, I like to add full-cream milk.
  5. Whizz the soup until it is smooth.
  6. Serve with bread and butter.

Payasam aka Kheer- Indian Dessert

Ingredients:

  • Basmati Rice.[because it is easy to cook]
  • Sugar- To taste.
  • Milk- 500 ml [for 3-4 cups]
  • Water- A tea cup
  • Ghee- 3 tbs
  • Raisins and Cashew nuts- 15-20 nos each

Danger Level: mild

Skill level: Be the master of your Kettle

Preparation:

For success of this preparation you should give your utmost care and concentration to the preparation. The preparation starts with cooking the rice. For normal preparation, we clean the rice and cook it with milk instead of water. But in a kettle it’s quite risky so. Cook the rice as mentioned in the post cooking rice but make sure that you didn’t add salt. Strain the rice and keep it aside. Now pour the milk and water into the kettle and allow it to warm and add rice to it. Add sugar to taste and allow the milk to boil. Make sure that you allow the milk to boil for 3-4 times by over riding the auto cutoff. Use a spoon to continuously stir the contents. Make sure that nothing stick to the bottom. Using a spoon aka spatula, check the rice by mashing it with fingers. If its soft and easy to mash. Check for the sugar. If that too is okay, part one is completed.

Now pour the contents to a bowl and clean the kettle. Now add 3 table spoon of Ghee to kettle and allow it to melt, then add raisins and cashew nuts to it and allow it cook till the raisins pop and cashew nuts turn to brown color. We will need to override the auto cut off many a times to get these things cooked to exact texture. Once it is ready switch of the kettle and pour the contents prepared in part one to the kettle. Kheer aka Payasam is ready [if everything went well :)]

Even though this is mentioned as a dessert you can have this as a meal too. It all depends on how hungry you are. Wish you a happy cooking with kettle.

Time: 

Heavily depended on your skill level. This is not something for the beginners, if you have successfully prepared all other recpies I have mentioned earlier, you will be able to do this too.

The Perfect Breakfast by Lee F, Winnipeg

Hi all. Here is a beautiful breakfast recipe shared by a friend. It was posted as a comment to a post of mine the link is attached herewith.
I took the liberty to share it with other friends of mine.

Thank you Lee


Here is the breakfast that I make nearly every morning: Hard boiled eggs, oatmeal and tea. Feel free to add it to your website as a recipe! I never measure my ingredients since I just woke up and cannot do math that early in the morning! Also, my amounts depend on how many people I am feeding that morning.

Fill your tea kettle with cold water and put in a few raw eggs. Set up the kettle and turn it on. While the eggs and water are heating from ice cold to boiling, take oats, brown sugar, cinnamon, and a pinch of salt and mix them all in a bowl. I use the same cereal sized bowl to cook it in as I do to eat it. I have also tried dried fruit, honey, nutmeg, apples, bananas, etc. Be creative! Prep your teacup with a tea bag. Once your kettle and eggs have come to a full boil and the kettle has clicked itself off, pour your cup of tea and add the boiling water to the oatmeal mix. Just make sure that your water is still above the eggs by at least 2cm. Set your timer for the eggs which are still in the hot water in the kettle after it has clicked off. 4min for runny eggs, 7min for medium, 10min for hard cooked. After my timer has buzzed, I then dump the remaining hot water off, fill the tea kettle with cold water to cover the eggs for a few minutes to stop the cooking. By the time the eggs are cooked and cooled the oatmeal is ready and the tea has steeped. Also, because my tea kettle shuts itself off automatically, I am able to go about my morning routine and I simply keep an ear out for the click of the kettle turning off.

I use a mix of quick oats and regular oats at about 50/50. This makes for a creamy oatmeal with a bit of texture to it- kind of like a breakfast oat risotto.

All the best,
Lee F. from Winnipeg Mb. Canada

Making Plain Rice

Ingredients:

  • Basmati Rice.
  • Salt, if you like it.
  • Water

Danger Level: mild

Preparation:

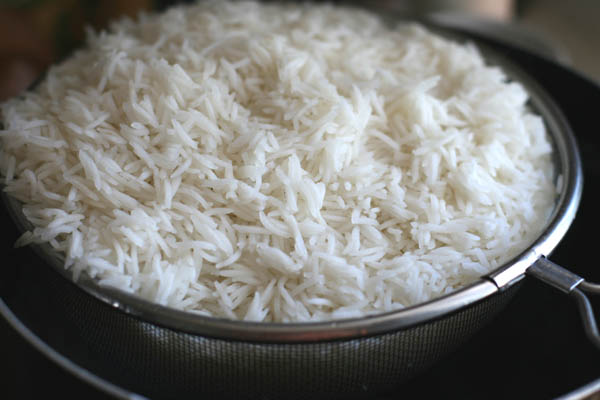
This is an easy preparation. First of all take a cup of rice( to serve one person) and wash it thoroughly with water. Drain the water. Connect the kettle to the supply and pour about half liters of water and allow the water to boil. Add washed rice to the kettle and close the lid. Allow the kettle to switch off automatically. After 5 minutes again switch on the kettle and let it get switched off automatically. Leave for 15 minutes. Using a wooden spoon pick some rice and check it by mashing with hand. If its easy to mash, then the rice is cooked. If not continue the on off process. And the leave the kettle idle for 15 minutes. The rice must be ready by now. Always ensure there is sufficient water in the kettle. Once the rice is cooked pour it on to a bowl. Add salt to taste. The Rice is ready. If you like to eat rice with some curry, strain the water using a sieve.

Time: 

For a 750W kettle the rice might take about  20 minutes.

Making Scrambled Eggs

Scrambled-eggs

Ingredients:

  • Eggs.
  • Salt.
  • Green Chilies
  • Coconut or sunflower oil
  • Pepper, if you like it.

Danger Level: mild

Preparation:

This is a tricky preparation. Break the eggs and pour the contents to a tumbler. Add salt to taste. Chop green chilies (for one egg, go with a quarter of a chili). Mix it all together and stir with a spoon. Connect the kettle to the supply with kettle switch off. Pour 2 tbsp of oil to the kettle. Keep every thing in handy places. Spread oil on the bottom of the kettle and switch on the kettle for  seconds, check if the oil is warm if not continue this in 2 second intervals till the oil is warm. Pour the contents of the tumbler in to the kettle and continue the on off process. Check for the cooked smell of egg. Switch of the kettle and scramble the egg with a spoon and continue the process till egg is completely cooked. Add pepper to garnish

This can be served on a bowl with sweet bread which will make a nice breakfast.

Time: 

For a 750W kettle the scrambled egg might take about  5 minutes

Making Coffee

Ingredients:

  • Frozen coffee or normal coffee powder.
  • Water.
  • Sugar.
  • Milk powder or milk.

Danger Level: Very Low

Preparation:

Pour water inside the kettle and connect the kettle to supply. Close the lid and allow water to boil. In the mean time in a coffee mug, add frozen coffee, milk powder and sugar to taste. Pour some warm water to the kettle and stir well. The fill the mug to level. Hot coffee is ready to be served. A word of advice, it’s better to stir from outside to inside. This will give a dual texture to coffee.

Time:

For a 750W kettle the coffee must be ready in less than 5 minutes.